Garage Door Installation
New construction or full replacement — we install every style of residential garage door across the Bay Area. Licensed, insured, and backed by warranty since 2009.
Installing a new garage door is one of the highest-ROI home improvements you can make. According to industry data, a new garage door recoups more of its cost at resale than almost any other renovation — and that is before you factor in the daily benefits of better insulation, quieter operation, and curb appeal that actually makes you want to pull into your own driveway.
At Integrity Garage Doors & Gates, we have been installing garage doors across the Bay Area since 2009. Our crew handles everything from ripping out the old door to programming your remotes and cleaning up the job site. Below, I will walk you through the styles we carry, how insulation works, what the installation process looks like, and what you can expect to pay.
Garage Door Styles We Install
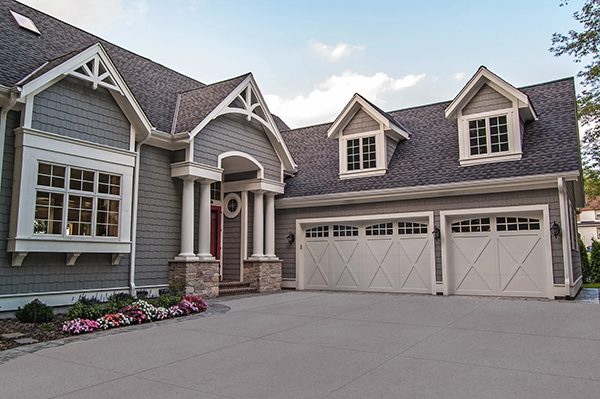
Choosing the right style depends on your home's architecture, your budget, and how you plan to use the garage. Here are the six most popular styles we install throughout Hayward, Oakland, San Francisco, Fremont, and the wider Bay Area.
Traditional Raised Panel
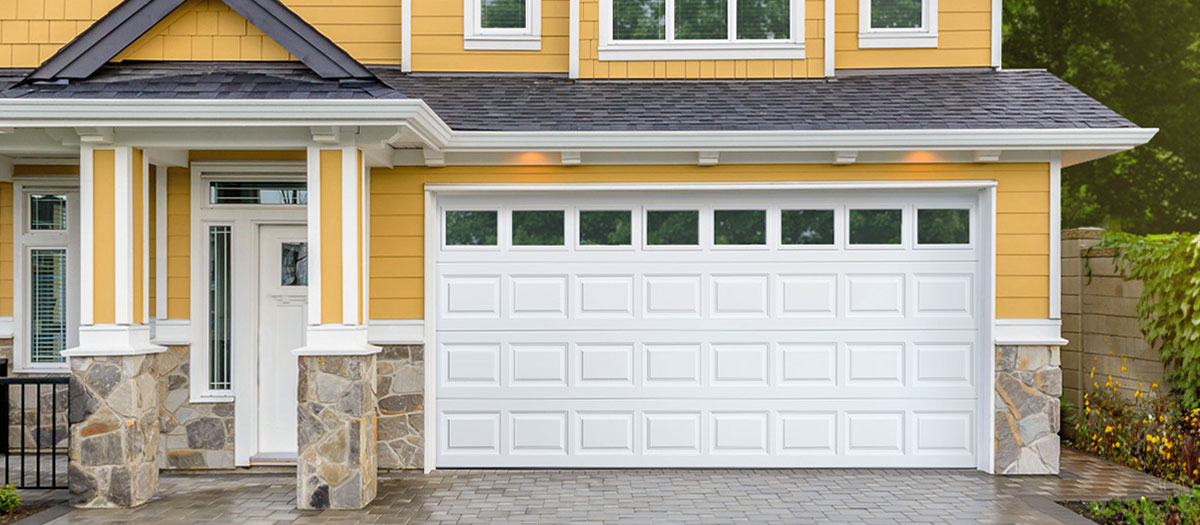
The workhorse of residential garage doors. Raised-panel doors feature symmetric rectangular sections that catch light and create depth. They suit colonial, ranch, and craftsman homes equally well. Available in steel (most common), composite, and wood, with insulation options from basic single-layer to triple-layer polyurethane. This is the style most Bay Area homeowners choose because it looks clean, lasts 20+ years with minimal maintenance, and comes in at the most accessible price point.
Carriage House
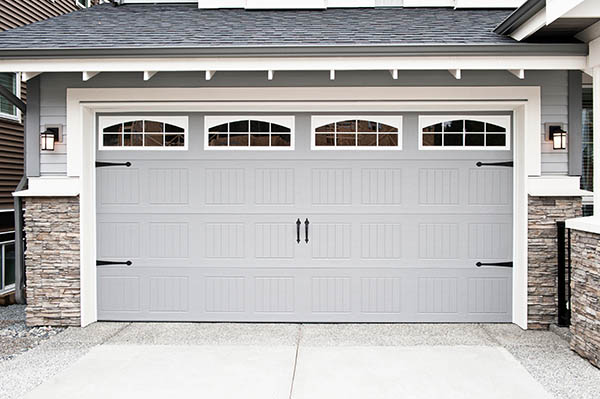
Carriage-house doors mimic the swing-out look of old barn-style doors but operate on a standard overhead track. Decorative hardware — strap hinges, handles, clavos — gives them that handcrafted feel. They pair perfectly with Mediterranean, Spanish, and farmhouse-style homes common in the East Bay hills and South Bay neighborhoods. Most carriage-house doors are steel with composite overlays, though we also install full-wood versions for custom builds.
Flush Modern (Contemporary)
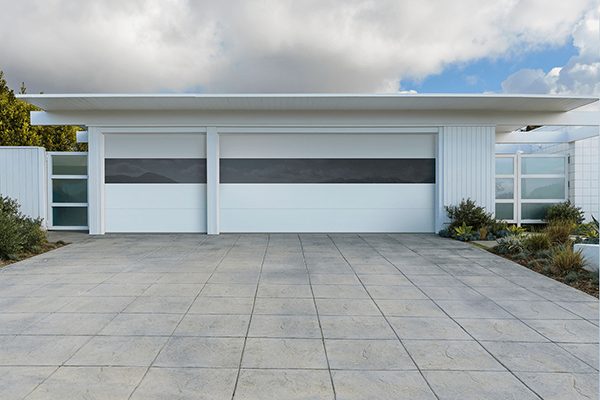
Flat, smooth-faced panels with no raised sections or ornamentation. The flush modern style is all about clean lines and letting the material speak for itself. These doors are popular with the contemporary and mid-century modern homes you see across San Francisco and the Peninsula. They are available in steel, aluminum, and wood, and can be finished in virtually any color. If you want your garage door to blend into the facade rather than stand out, this is the way to go.
Glass and Aluminum (Full-View)
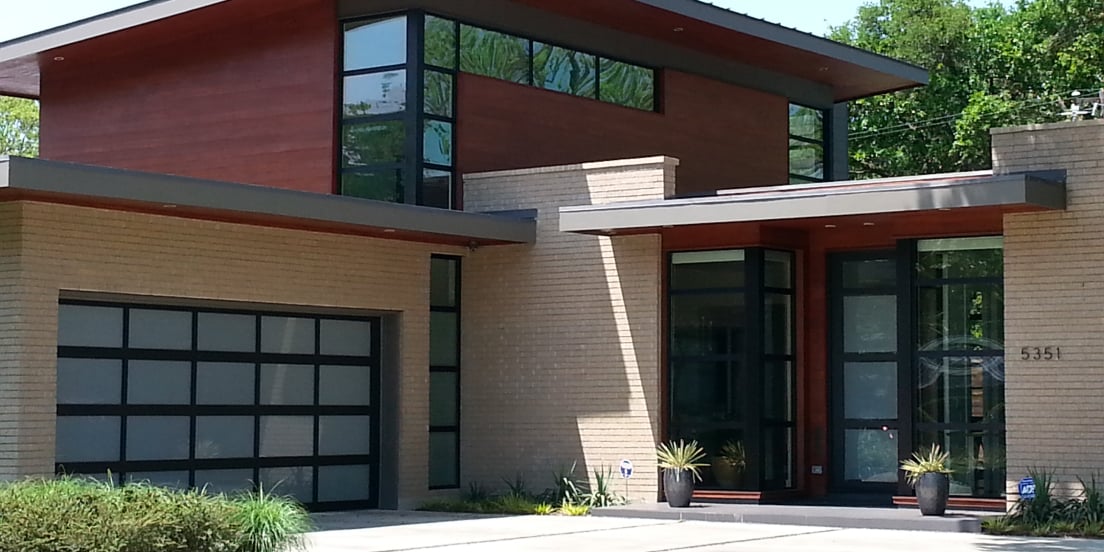
Full-view doors use an aluminum frame with glass panels — clear, frosted, tinted, or mirrored — filling each section. They flood the garage with natural light and give the facade a striking, modern appearance. They are ideal if you use the garage as a workshop, home gym, or entertaining space. Frosted or obscured glass keeps the interior private while still letting light through. Insulated glass options (double-pane) handle Bay Area winters well, though these doors have lower R-values than solid steel or wood.
Wood Overlay
Wood-overlay doors combine a steel core for structural strength with genuine wood cladding on the exterior. You get the warmth and grain of real wood — cedar, redwood, mahogany, or hemlock — with the durability and insulation of a steel-backed door. They cost more than all-steel options but less than full solid wood, and they hold up better in the Bay Area's coastal moisture. Plan to reseal or restain the wood every 2 to 3 years to keep it looking its best.
Steel
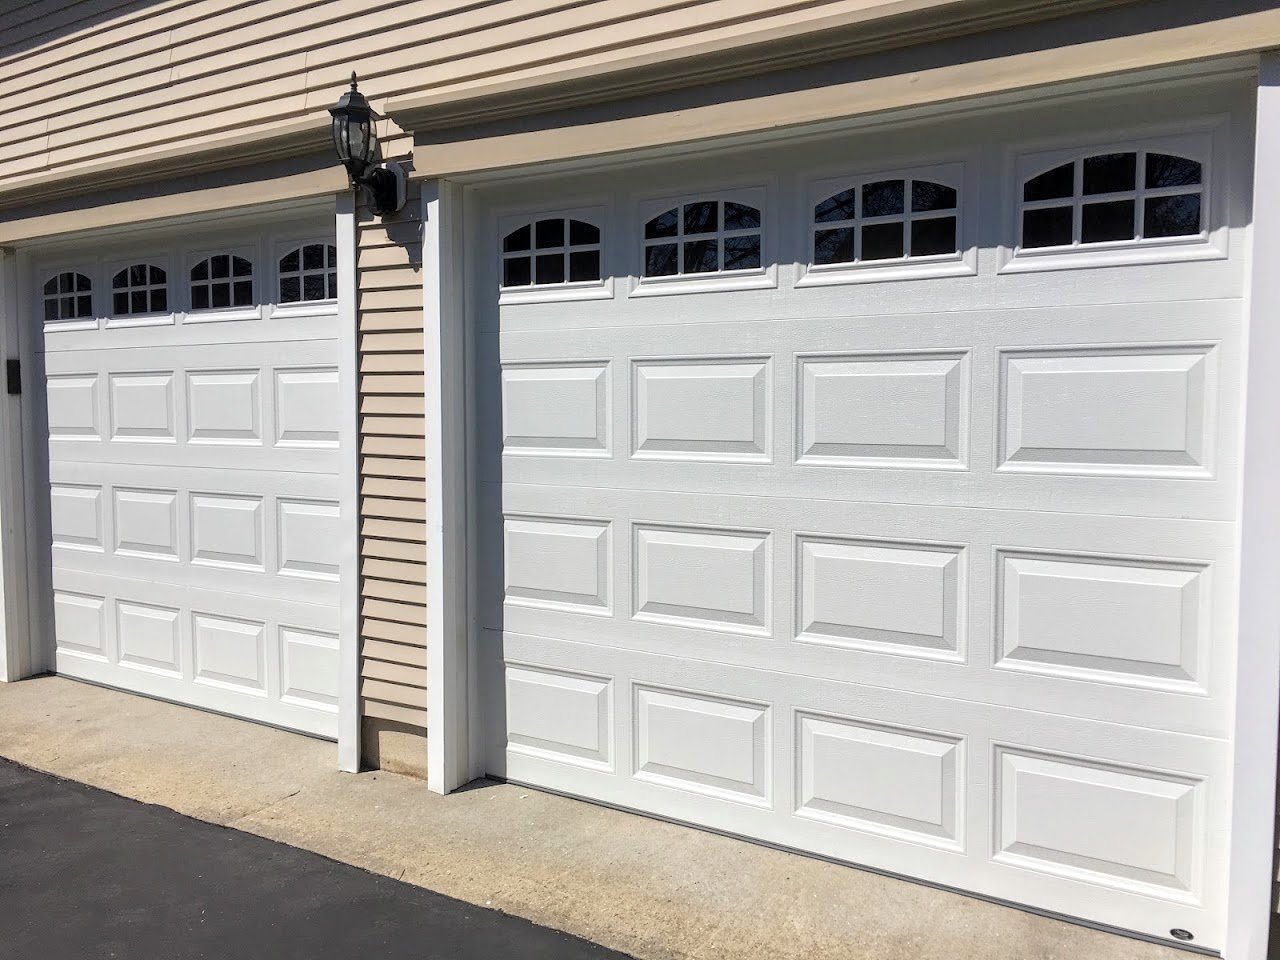
Plain steel doors — single-skin or insulated — are the most economical and lowest-maintenance option. Modern steel doors come in a wide range of finishes and can be painted any color. They resist dents better than aluminum and will not warp, crack, or rot like wood. For homeowners who want a reliable, long-lasting door without fuss, a quality 24- or 25-gauge steel door with polyurethane insulation is hard to beat.
Understanding Insulation
Insulation is one of the most important factors in a garage door purchase — especially if your garage is attached to the house. Here is what the jargon actually means.
R-Value Explained
R-value measures a material's resistance to heat flow. The higher the number, the better the insulation. A non-insulated single-skin steel door has essentially no R-value. An insulated door typically ranges from R-6 to R-18. For the Bay Area climate, an R-8 to R-12 door is ideal for most homes. If your garage is directly below a bedroom or you use it as a living space, consider R-12 to R-16.
Polystyrene vs. Polyurethane
Polystyrene is a rigid foam board that fits between the front and back skins of the door. It is the same material used in foam coolers. It provides decent insulation (typically R-6 to R-8), adds some structural rigidity, and is the more affordable option. You will find it in mid-range doors.
Polyurethane is sprayed as a liquid into the door panel, where it expands and bonds to both the front and back skins. It is denser, fills every gap, and delivers higher R-values per inch (typically R-12 to R-18). The bonding process also makes the door stiffer, quieter, and more resistant to denting. It costs more, but the energy savings and noise reduction are worth it for attached garages.
Construction Layers
- Single layer (non-insulated): One skin of steel or aluminum with no backing. Lightest weight, lowest cost, minimal insulation. Fine for detached garages used strictly for parking.
- Double layer: Steel front skin plus polystyrene insulation, backed by a vinyl or steel backer. A good mid-range option that adds thermal resistance and noise dampening.
- Triple layer (sandwich): Steel front skin, polyurethane foam core, and full steel back skin bonded together. The strongest, quietest, and best-insulated construction. This is what we recommend for attached garages, homes in areas with temperature swings, and anyone who wants a door that feels solid and runs quietly.
The Installation Process
Understanding what happens on installation day helps you plan your schedule and know what to expect. Here is our step-by-step process.
Step 1: Old Door Removal
If you have an existing door, our crew starts by disconnecting the opener and releasing the spring tension safely. We remove the door panels section by section, then take down the old tracks, brackets, and hardware. The old door and all hardware get loaded onto our truck for haul-away — included in every installation at no extra charge.
Step 2: Inspection and Preparation
Before installing anything new, we inspect the opening, header, and framing. We check that the opening is square, the header can support the new spring system, and there is adequate headroom and sideroom for the track layout. If any framing repairs or adjustments are needed, we handle them before proceeding.
Step 3: Track Setup
We install the vertical tracks on both sides of the opening, then mount the horizontal tracks that run back into the garage along the ceiling. Every track is leveled, plumbed, and secured with lag bolts. Proper track alignment is critical — it determines how smoothly and quietly the door runs for years to come.
Step 4: Panel Assembly
Starting with the bottom section, we set each panel into the tracks, attach the hinges and rollers, and stack them up one by one. We use nylon rollers as standard because they are dramatically quieter than steel rollers and do not require regular lubrication. Each hinge point is torqued to spec.
Step 5: Spring System and Cables
Once all panels are hung, we install the torsion spring system above the door. The springs are custom-wound to match the exact weight of your door — this is a precise calculation based on door height, width, and weight. Properly calibrated springs mean the door lifts evenly, the opener does not overwork, and the system lasts its full rated cycle life (typically 10,000 to 25,000 cycles depending on the spring grade). We connect the lift cables, set the cable drums, and wind the springs to the calculated number of turns.
Step 6: Opener Integration
If you are getting a new opener (or keeping your existing one), we connect it to the new door, set the travel limits, and adjust the force settings. We program your remotes, wall button, and keypad, and set up Wi-Fi connectivity if your opener supports it. We also test the auto-reverse safety feature to make sure it meets current code — the door must reverse if it contacts an obstruction or if the photoelectric sensors are blocked.
Step 7: Final Adjustments and Cleanup
We run the door through a dozen open-close cycles, checking for smooth travel, proper sealing at the bottom and sides, and quiet operation. We adjust the weatherstripping, install the top seal, and make any final tension or track tweaks. Then we clean up — any debris, packaging, and the old door go with us. You get a walkthrough of how to operate and maintain your new door, and we answer any questions before we leave.
What It Costs
Garage door pricing depends on the door style, material, insulation level, size, and whether you need a new opener. Here are the realistic ranges we see on Bay Area installations — parts, labor, and haul-away all included.
Single-Car Door (8x7 or 9x7)
- Basic steel (non-insulated): $1,800 – $2,400
- Insulated steel (R-8 to R-12): $2,200 – $3,200
- Carriage house steel: $2,800 – $3,800
- Wood overlay: $3,500 – $5,000
- Glass/aluminum full-view: $3,800 – $5,500
Double-Car Door (16x7 or 18x7)
- Basic steel (non-insulated): $2,400 – $3,200
- Insulated steel (R-8 to R-12): $3,000 – $4,200
- Carriage house steel: $3,800 – $5,200
- Wood overlay: $4,500 – $6,500
- Glass/aluminum full-view: $5,000 – $7,000
Add-Ons
- New opener (belt drive, Wi-Fi): $850 – $1,200 installed
- Decorative hardware kit: $150 – $350
- Window inserts (2 rows): $200 – $500
- Custom paint or stain: $300 – $600
Every estimate we give is all-inclusive — door, installation labor, hardware, spring system, weatherstripping, old door removal, and cleanup. No surprise line items on your invoice. We will walk through the quote with you line by line before any work starts, and the price we agree on is the price you pay.
Not sure which door or options make sense for your home? Give us a call at (888) 485-6995 or request a free on-site estimate. We will measure your opening, discuss your priorities, and give you an honest recommendation — no pressure, no upselling.
Garage Door Installation FAQs
Common questions we hear from Bay Area homeowners about new garage door installations.
A standard single-door replacement typically takes 3 to 5 hours. If we are removing an old door and installing a new one with a new opener, plan on a full day. New construction installs without an existing door to remove are usually faster — around 3 to 4 hours.
Installed prices range from about $1,800 for a basic single-car steel door to $6,500 or more for a custom wood or glass-aluminum double door. Most Bay Area homeowners spend between $2,200 and $4,500 for a quality insulated door with professional installation.
If your door is over 15 years old, has multiple damaged panels, or has structural issues like a bent track or warped frame, replacement usually makes more sense. A new door also improves insulation, curb appeal, and home value. If only one panel is damaged or the issue is mechanical (springs, cables, opener), a repair is typically more cost-effective. We will give you an honest assessment either way — we do not push replacements when a repair will do.
Yes, every installation includes full removal and haul-away of your old door, tracks, and hardware at no extra charge. We clean up the work area and leave your garage ready to use.
For the Bay Area climate, an R-value between R-8 and R-12 is a solid choice. R-8 polystyrene insulation works well for most homes. If your garage is attached to living space or you use it as a workshop, step up to R-12 or R-16 polyurethane for better temperature control and noise dampening.
Absolutely. We handle new construction installs and conversions regularly. We will measure the opening, check the header and framing, and make sure the structural support is right before installing the tracks and door. If minor framing adjustments are needed, we can take care of that too.
Ready for a New Garage Door?
Call us today for a free on-site estimate. We will measure your opening, show you options, and give you an all-inclusive price — no pressure, no hidden fees.